Tuesday, September 18, 2012

Sneak Peak at Mari's Halloween Costume

I've been in the mood to decorate for fall. I haven't been in the mood to get the decorations out of the depths of the super hot and stuffy attic. So, I've been doing other things to prepare for autumn until Daniel has a few minutes to go into the attic, like making caramel apples, spice cookies, and Mari's Halloween costume.
There is a very good chance that I will be in the hospital on Halloween, being the day before my due date. Regardless, I would really like Mari to go trick or treating at the park this year. She seems a bit young to take door to door trick or treating, but I really like that people from different community organizations are going to be at the new park near our house handing out candy in the afternoon. Whomever is watching her will have to take her if I can't!
Choosing a costume took a lot of thought. Pinterest has so many amazing ideas. I especially like the gumball machine costume and little red riding hood. However, I was limited, because I didn't want to spend any money on supplies. I'm not sure why we even thought of a strawberry. Our first choice was a little park ranger, because of a super cute park ranger uniform we saw at Rocky Mountain National Park last month. The toddler size was $45, so we didn't buy it, but it really was the cutest thing, even coming with mini aviator sunglasses and binoculars. She and her daddy could have matched, because Daniel still has his park ranger uniforms! Trying to sew a khaki shirt and dark green pants would have been too time consuming for me, and I would have had to buy fabric and a pattern. Anyway, we already had lots of felt in all different colors, and Mari has a red shirt and tights. So, the only thing I bought was some red tulle from Joann's for $3.

This will get sewed or glued to one of Mari's green headbands

Strawberry flower pin is made out of felt. I may add some red ribbon and glitter to her tutu.

Mari is pretty happy with her tutu. She wore it all evening over top of her fleece pj's. I tied the tulle around 1" elastic, but if I ever make another tutu, I will tie it to a long piece of ribbon, so it can tie around her waist.
I cut out a bunch of dark drown felt seeds to glue to her red shirt.
The strawberry cap headband is just made out of felt that is hot glued together, as is the strawberry flower.
We'll have to see how she looks, but if I find a pair of cheap fairy wings, she could be a strawberry fairy...

At the thrift store yesterday, I found several costume patterns for the wizard of oz, prairie girls, and pirates for 50 cents. I'd really like to make Mari a prairie dress and bonnet and the Dorothy dress in the future.


Monday, September 10, 2012

More on the boat bed and our weekend

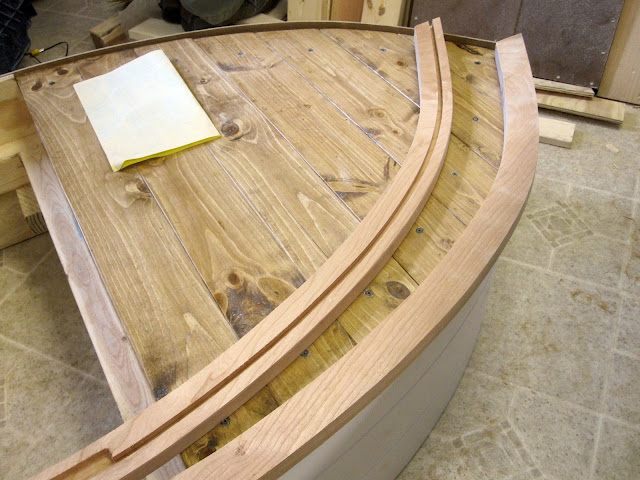
Daniel spent a good portion of Saturday making a wall with portholes in it for the boat bed. Because of the way bunk bed posts stick out, without some kind of wall, there was a sizable gap between the mattress and the wall. Instead of putting another railing on that side, we thought something with portholes would be cool.

Daniel is happy with how the portholes turned out!
He used a big hole cutter and the router to make awesome wooden frames for the portals. I need to stain and varnish them before we permanently attach them to the white paneling. Right now they can pop out.


Next thing to do it make headboards!
This project is taking a really long time to complete. That's Ok though, because we don't plan to transition Mari into the new bed until she is about 2 years old.

Sunday, we didn't work on the bed at all because Daniel was busy replacing the intake manifold gasket on the Saturn. I helped a little bit. The Saturn has over 275,000 miles on it and has been problem free up until recently. For the past couple weeks the check engine light has been on. Daniel wasn't 100% sure replacing this would turn off the light, but figured it was worth a shot. He knew it was sucking in air because the idle would change when he sprayed cleaner around intake manifold...  Sure enough, the old gasket was falling to pieces and in pretty bad shape. I went to Pepboys looking for a new gasket, but they don't carry that kind. Advance Auto Parts had it, but first they accidentally sold me the wrong one. Fortunately we live about 2 miles from  them and I could do a quick return. Before going back, I wanted to make absolutely sure I knew what we were supposed to be getting, so I looked up the part number on the internet and wrote down other stuff too, including the price. When I got to the store and showed the guy the part number, he saw the price I found and said they would match it. So, that made me not so miffed that I had to run an extra errand. At least Mari stayed home with Daniel.
I should have taken some pictures of Daniel working on the car, because he got so dirty! The whole thing was harder to get apart than it was supposed to be. There wasn't as much room to get the manifold off as the instructions indicated, so he had to take a lot of other stuff apart. The weather was really nice (breezy, sunny, low 70's), which is great because he was outside from about 11am-6pm.
The other thing we did this weekend was yard work. I pulled all the weeds growing along the drainage area along our property line as well as the weeds in our driveway and path. Roundup would have been quicker, but we didn't have any, and it rained Saturday night, so they mostly came up OK. Our neighbor came over as I was doing it and said he would edge our yard with his edger next week. I filled up two large garbage bins with weeds and twigs.
That's pretty much our weekend!


Sunday, September 2, 2012

Three and a half years ago...

...we bought our house. I wrote this post back on the 3rd anniversary in March, but forgot about it all my drafts.

We closed on our house on a Tuesday, over our lunch breaks. I don't remember why we didn't take the entire afternoon off. I was sooooo anxious to leave work that day and be at the house. I didn't even want to stop at the apartment for dinner after work, but we did at Daniel's request and drove over to our new home together. Other than walking through a couple times, I hadn't taken a good look around. I didn't check out the  insides of closets, cabinets or the shed, or really looked very closely at anything before we made an offer. When we were considering buying, that stuff didn't seem important to me. I knew based on the general atmosphere and my vision for the future that this would be a good place for us to live. So, our first evening there we explored a lot, amazed that we were HOMEOWNERS. We also marveled at how dirty the place felt.

Fortunately, we were able to spend a few weeks living at our apartment while we worked on the house, redoing the floors and painting. We also needed to prime the entire apartment, because we had painted all those walls.

Here's something I wrote in my journal in the midst of moving, "We have been working like crazy people, trying to get the house ready to move in. I've never done so much cleaning in my life. Every evening since we have closed, we have been working hard - trying to get rid of the smell.  I hope that soon all this work (and aching back) will become a distant memory. The first thing we did was take down all the blinds and curtains." 
Those red vinyl curtains were screwed into the wall amazingly well. I suspect they were never washed, because removing them took superhuman strength (so it's a good thing Daniel was there). Originally, our timeline involved tearing up the carpet on that first night. In reality, we didn't get to that until the next day because hadn't counted on the curtains being so difficult, and we enjoyed wandering around looking at stuff. Haha. After this house, we know to double whatever time restrictions I place on projects,because we never complete them on time.

Even the dirtiest jobs, like scrubbing the shower and discovering that it is supposed to be white and not tan and trying to remove the stains from the floors and painting ceilings were really satisfying, because it was our house. Daniel and I had a good time together, working on projects until 1 or 2am even when we had to get up for work the next morning. There were a couple evenings I remember looking at the clock and thinking that 10:30pm was still plenty early and I had lots of time to give a room a coat of paint. We shared many a frozen dinner on the floor because we were too busy to cook dinner and didn't have any furniture there. I have mostly forgotten the work and just remember how fun it was, until I look at the pictures.

Below are some before and afters.


Laundry room
                  We painted the walls, tiled the floors, replaced the doors and put up shelves in here.
After - Laundry room


Before - dining room
This was an easy room. We took down the folding doors into the living room and painted the walls.
After - dining room.
All the other rooms need to be separate posts, because so much work was involved!

Tuesday, August 21, 2012

Boat Beds are done... almost!


We set them up in Mari's room. The painting and varnishing took longer than expected, with the wait times for drying and all that. Daniel bought some frog tape from Home Depot, which is how to got the blue stripes so straight, and it was amazing! We have tried other types of painters tape and masking tape and always had trouble with paint bleeding under. Not so with frogtape! I enjoyed using it so much that today I used it painting the bathroom ceilings.


So, we still need to made headboards and railings for the boat bed, but we are not really sure how we want to make them yet, and they can easily be added in Mari's room, so there is no rush. We need to make a ladder too, but might hold off on installing that to save worry about her falling off.
I've enjoyed looking for buoys and other decor online. We found some small, yellow ones at Overtons that are only $13 apiece.
More to come on the bed next week!

Oatmeal date cake

I was listening to a mystery book the other day in which they mention eating some kind of oatmeal date bars. That made me crave oatmeal date bars, and I immediately looked up a recipe. Surprisingly, I had dates on hand. Unfortunately, I didn't have enough of the right ingrediants for any recipe that I found, so I looked at several different ones and created my own version to make these fabulous date bars. Daniel likes them too and said he was surprised at how good they turned out, which made me happy because he doesn't care for dates or oatmeal very much. I don't want to forget what I did, so we can have these again in the future.

OATMEAL DATE BARS

Food Process:
2 cups old fashioned oats
1 cup flour
1/2 teaspoon baking soda
1/2 teaspoon salt
3/4 cup lightly packed dark brown sugar
Add:
1 stick cold butter
1/2 cup canola oil

Preheat oven to 350F.
Butter a 9 in square pan. 
Press 2/3 of the oat mixture into the pan.

In a pot over low heat, simmer 1 package of chopped dates (I don't know how many cups that is... maybe 1.5), 1/2 cup water, 1/4 cup sugar and 1 teaspoon vanilla until most of the water is absorbed. Took me about 10 minutes.

Pour date mixture into pan. Top with remaining oat mixture and bake for 25-30 minutes.

Daniel said the flavor of this reminds him of pecan pie. I have never eaten pecan pie, so I'm not sure...
We have been keeping these in the refrigerator and eating them cold. A very large glass of cold milk is a necessary accompaniment.


Sunday, August 19, 2012

The table is in the kitchen

Our table is done and set up! Our chairs are getting closer to being done! So much sanding and painting later...
I hate sanding. Mostly because of how uncomfortable I am wearing the face mask. I hate the way sanding dust covers EVERYTHING. The chairs took two days of sanding. Some was done with the orbital sander, but most by the strength of my own hands, cause of all the curves. I sanded until I couldn't take anymore, and felt like begging Daniel to tell me that it was good enough. Looking back, now that the chairs are stained, I kind of think I should have done a little more sanding around the spindles because I didn't get all the old stain off, but am trying to embrace the rustic "farm table" look of imperfection.
Same embracing of rusticness goes for the table. I thought I sanded the 3rd coat of Verathane with 400 paper, but based on the scratches that I see now that I have applied the final coat, I must have used 320 or 220. I kind of is driving me crazy, especially since the 3rd coat was as perfectly smooth as glass and looked 100% fabulous. I also used a different, larger, more worn brush for the final coat, thinking it would save a little time, but it made brush strokes. You can't really tell unless the light is shining on the table and you tilt your head sideways. I'm done with the table top though. Someday way down the road when I am bored, I will take it out to the tool room, sand it, and apply another coat of Verathane.
So, once the sanding was done, I stained the seats of the chairs with dark walnut stain and applied the varnish.
The next step after the seats dried was taping them, so the paint wouldn't get on that part. I spent most of Friday morning taping the seats. Daniel was home from work with a cold, and he watched Mari practically all day, so I  could devote uninterrupted hours to finishing these chairs.


I tried Kilz oil based primer in an aerosol can. I wanted to spray the primer because of all the nooks and spindles, and figured paying a few dollars for a can was worth the time and trouble of cleaning oil based primer out of the spray gun. I sprayed the paint with the spray gun, cause that it not oil based.We chose black paint (Valspar Lincoln Cabin black). Spraying two coats on all the chairs and table legs only took 1.5 hours.

Other thoughts on paint: I noticed Lowes and Home Depot sell paint and primer in one unless otherwise specified. That is so annoying to me, since it isn't the same as using a stain blocking oil based primer, and if I'm using primer anyway, I don't want to pay 40% more (or however much more they charge) for paint that will apply a little thicker. That's really all the paint and primer does. Here is a brief summary of the combo paint: Roomations.com
However, I bought the paint & primer Valspar paint (1 qt. was $20), and I really like how it went on. The base of the table was hand painted, and one coat covered marvelously well despite the white primer underneath. I applied two coats, just for good measure. I also used an expensive Purdy brush, but this was the first time I've ever painted anything and not had any brush strokes show up.

Finished chair!

The color is a little funny in this picture. In real life it don't look so shiny and blue.
Painted and drying - this is a bit more true to real life color
Daniel took apart our old table to store in the attic. I felt a little teary to see it taken apart, since we've been using it ever since we were married. I'm looking forward to when we have room to use it again, because right now I am a little hesitant to let Mari do anything off the new table, since it's so new... I'm sure that feeling won't last long.

Friday, August 17, 2012

Marbles

I made good cookies yesterday and thought you (especially Mom) might want the recipe. It's a Mrs. Fields recipe from an old book that I have.Very easy and a little different from the ordinary standbys that we usually make (chocolate chip, sugar, peanut butter, molasses, chocolate crinkle, and snicker doodles).

Makes about 2 1/2 dozen

2 cups flour
1/2 teaspoon baking powder
1/4 teaspoon salt
1/2 cup (packed) light brown sugar (I used dark brown cause it's all we had)
1/2 cup granulated sugar
1 stick softened butter
1 large egg
4 ounces sour cream (1/2 cup)
1 teaspoon vanilla
6 ounces (1 cup) chocolate chips

Preheat oven to 300F.
Combine first three dry ingrediants and set aside.
Cream sugars and butter. Add egg, sour cream and vanilla and beat at medium speed until light and fluffy.
Add flour. Do not over mix.
Melt chips in the microwave. Pour over cookie batter. Using a spatula or wooden spoon, lightly fold in the melted chocolate to create a swirled, marbleized pattern.
Drop by rounded tablespoons, 2 inches apart on ungreased cookie sheets.
Bake for 20 minutes. Do not brown.

I think they are best right out of the oven. Otherwise, we like to heat them up in the microwave for a few seconds. These cookies are very good for my health right now, because they cause me to drink lots of milk, and the baby needs calcium. =-)


Monday, August 13, 2012

Girl blankets for a boy

This weekend I tried dying clothes at home! I read online somewhere about how easy dying clothing in the washing machine is, so that was my original plan. Once I read the RIT dye package, I decided the stovetop method would probably work better, because even though our HE washer has a hot setting, I was unsure about putting salt in my machine.

Getting ready

Overall, I just followed the directions on the package of navy blue dye, pre-dissolving the dye in 2 cups of hot water and adding a cup of salt (I used canning salt and the kitchen smelled like canning pickles), simmering the clothes for 30 minutes in 2 gallons of water while stirring constantly, and then rinsing the clothes in warm water until the water ran clear. Rinsing took just as long as simmering. Once that was finished, I stuck them in the washing machine for 2 cycles. The bathtub sustained some color damage, but nothing a little bleach couldn't handle. On the plus side, our bathtub has never been so clean!

I dyed a bright red maternity sweater and 2 pink "Swaddle me" blankets from the salvation army. The sweater, I only wore a couple times because I don't look very good in red. Hopefully, the weather will get chilly enough by the end of October for me to break out the winter maternity clothes, now that this sweater is a more appealing color. The pink blankets, I picked up recently, being too good a deal to pass up at 99 cents apiece. Unlike Daniel, I am hopeless at swaddling with a real blanket, so these are awesome.

After


Unfortunately, I didn't take any before pictures, but I am so happy with how the blankets turned out! The white and dark polka dots showed through on one blanket, but that's OK. I might sew some yellow stars on the plain blanket if I get bored this week.
The navy blue dye turned my bright red sweater into a nice maroon color. It's a very soft sweater, so I am hoping for a chance to wear it! After so many months, most of my summer maternity clothes have lost their appeal.

After

This was a fun project. Not as fun as tie dying was as a kid, but almost. I would be up for doing it again.
By the way, the dye was half the price at Michael's than it was at Joann's, and that is without coupons.

Thursday, August 9, 2012

Kitchen table and chairs

     We bought a kitchen table and 4 chairs off craigslist a couple weeks ago. Our chairs are upholstered in cream colored fabric and are not holding up to Mari very well. I wouldn't mind the white, and would actually prefer it, if we could easily  wash the covers. Our slip-covered white armchair has turned out to be fantastic and still looks as good as new after I wash it with a little bleach. Alas, the kitchen chair cushions are attached with dozens of staples. I'm ready for some easily-wipable wooden chairs now. 
     I tried really hard not to get excited about this table and chairs when I saw them online. The guy was only asking $50 and the solid wood table is really pretty. After some e-mailing we arranged to pick up the set later that day. Turns out, a dog has chewed many of the chair legs and they are uncomfortable, at least when compared to our plush, cushy, rolling chairs, but when the guy lowered the price to $30, I couldn't say no. We figured they would need to be refinished anyway because of the color, and most of the chew marks are superficial.

     Our current table is very functional and we've been extremely happy with it. It's some kind of laminated particle board - virtually indestructible. The only downside to this table is that it doesn't look very nice without a tablecloth on it. Still, we want to keep it for a craft/school table. Someday, if we have a dining room and eat in kitchen, two tables with be handy. In the meantime, two tables and eight chairs won't fit in our dining room, so Daniel took the legs off the new one and is storing it in the shed until I can start working on it.

One week later:
I started refinishing our kitchen table! I had been waiting for the perfect, cool evening to do it. Daytime weather is too hot and humid and Daniel and I cleaned the tool room, so I didn't want to sand in there.
The finish was very easy to sand off. It took about 1.5 hours with 60 grit sandpaper and the orbital sander to get most off. By then the sun had set and I had to quit. The table is so heavy that Daniel moved it in and outside for me. I'm impressed he could manage it alone.


Early the next morning I spent another hour sanding with 120 sandpaper. After that I switched to sanding by hand with 220. Finally, an hour after that, I gave it a final sanding with 400 and cleaned the dust off.
Daniel moved it inside and I began staining using leftover Dark Walnut colored stain. The color is a little darker than we originally wanted... It looked much lighter on the underside section of the table that we tested. Oh well... in general, I'm really happy with it.

Close up

The table saw makes a great work surface

Another view


Every day for the past four days I've been giving it a very light sanding and applying a coat of Verathane. So, the top is done! Now we need to pick out a paint color for the legs and chairs. We'll probably go with a very dark blue or green, like they already are. We decided that stripping all the paint off the chairs and table would be WAY too much work, so I'm just going to sand off the teeth marks and rough up the paint enough to re-paint them.

My goal is to have this done by the time our new baby is born. Hopefully, I'll get on a roll and finish them this month. The weather needs to cooperate for that though. 


.

Monday, August 6, 2012

Sneak Peak at Mari's Birthday Present

Mari loves accessories. She will keep sunglasses on for hours. She likes to wear tons of jewelry, play with hats, socks, and anything else that she can get to stay on her head or around her arms. So, Daniel and I want to give her some dress-up clothes for her birthday. Given her love for "capes" (blankets draped around her shoulders), I thought it would be fun to sew her a real cape. Even though she doesn't turn 2 until November, I wanted to sew it now, in case I don't feel up to it later. Yesterday, I went to the fabric store and picked out the pinkest fabric there. Originally, I was going make my own pattern, but McCall's patterns were on sale for $1.99, so I bought one of those too.

Since Daniel stayed home with Mari, I enjoyed taking my time choosing fabric and browsing the fall decorations. With 20 people in line at the cutting counter, it's a good thing I wasn't in a hurry! Deciding whether or not to make it a pink cape was tough because they had this sparkly, navy fabric that would have made a really great magicians cape. The green and purple fabric was really nice too. In the end, I just couldn't make up my mind, and I was afraid Daniel would think I was never coming home, so I went with my original idea and bought pink.
This picture shows the sparkles!
This project was definitely my speed. The pattern was super easy and it took about 2 hours to make. We are not going to use grommets and ties, because our grommet maker is rather large, and Mari wouldn't be able to put it on by herself. We'll figure something out with velcro, but I still need to buy that, so it's not officially done yet. Now that it is made, I with there was some kind of collar or hood at the neck. Maybe next time I'll modify that...
Almost done!

The length is long for Mari. It'll probably touch the floor. I haven't tried it on her yet because I don't want her to see it. Even if it trails along a bit, she'll grow into it.

Michael's had some dress up clothes on a major clearance sale over the weekend, and I picked up come pink slipper-style dress up shoes to go with this.

I'm so eager for her birthday in November!

Friday, July 27, 2012

Wall Art

     Our bedroom walls need a little art. So does the living room. I've been looking online (especially Etsy) for ideas and inspiration. I tried my hand at watercolor painting in an attempt to DIY our art, but in the end decided that I probably need a lot more practice before creating a wall-worthy piece. There is a WPA print of Denali National Park that Daniel and I both like. At $40, it's a little more than I wanted to spend. After continued searching, I discovered an over-sized calendar containing this and 11 other prints for less than $20! I've pre-ordered the 2013 calendar and can hardly wait for it to come. Each print is 13x 19 inches. Three of them should look OK over the fireplace. Despite being reproductions of vintage prints, I am hoping that the bright colors and retro look will give our living room a younger, fresher vibe. We would like each one to have some kind of personal significance, so we'll probably hang the Blue Ridge Parkway picture with Denali.


Mount McKinley National Park

Monday, July 23, 2012

Boat Beds II

Daniel got home around lunch time today, giving us an early start to the weekend and more time to work on the bunk beds! He managed a lunch break yesterday to pick up the cherry from the lumberyard. He has been figuring out how to make the trim this afternoon. It seemed kind of complicated, so while he did that, I cut lots of plugs to fill the screw holes on the posts.I drilled way more than we needed, just so they will be readily available for future projects, and cause it was kinda fun.
Here's a look at the posts. I sanded them today and will put another coat of varnish on tonight, once we are done sawing.

I like using the drill press best out of all the tools. It is quiet and doesn't seem life-threatening in any way.


Trim pieces
That's really everything new. With running on Monday night, soccer on Wednesday, and Happy Hour on Thursday night this is the first opportunity we've had to spend some time in the tool room.

Tuesday, July 17, 2012

Boat Bunk Beds

The summer is whizzing by. Our most recent project has been getting Mari's room ready for the new baby. We are completely changing it from pink and green to a nautical theme (they will be sharing, but I think this theme will work well for girls too, despite the reds and blues). This includes getting a new bed for Mari, since the baby will need the crib. Originally, we both loved the idea of bunk beds, but once I taped it out on the floor, we realized the room was too small for twin sized bunk beds. We would have to get rid of the dresser, the changing table or the rocker in order to fit a twin bed. I was OK with ousting the rocker, but Daniel was adamant that it stayed since he will probably be the one who uses it when the baby wakes up crying at night.
Our creative solution was to build toddler sized bunk beds. Since Mari has always been on the short side, we figure she will be able to sleep in this size bed until she is 5-6 years old. At that point, we will probably have moved to a bigger house and she could have her own room, twin sized bed included.
I couldn't find a picture of Mari's room, but here is a video that shows what it looked like, minus toys scattered everywhere.


So, we wanted the bottom bed to be shaped kinda like a boat, with a rounded front. The top bunk will just be square. It truly has been a joint collaboration. We both designed it, figuring out the dimensions and cutting all the wood together. Daniel mainly figured out how to make the front part rounded and sturdy, and I stained everything that will not be painted. Here are some of the in progress pics from last weekend.

Daniel working hard

The bottom frame

Success with the jigsaw

Mari likes it already!

It's starting to look more like a boat
Since then, we have been working on the posts, which are made from two 2x4's screwed together. This saved us about $20 from having to buy 4x4 posts, . I was a little skeptical about how this would look, but after much sawing, sanding and staining, they look great! Daniel sawed off the corners to make them look rounder and more mast-like.

Left to do includes: assembling the top bunk, cutting and attaching the trim, mounting the bunks to the posts

We are kinda stuck until the weekend, because we need to go to the lumberyard, which is only open when Daniel is at work, to get more cherry trim pieces and buy a new router bit.

All told, these beds will have cost about $100 in materials, since we already have the paint, stain, and varnish we'll be using, as well as sandpaper. Using pine reduced the cost a lot (although the trim will be cherry cause we already have a little of that). Not bad for solid wood bunk beds, even if they are toddler sized. That doesn't include the mattresses. I've been researching those on amazon, trying to find the best, thickest one with the highest weight limit and best reviews. It's almost as time consuming as building the beds!


I can't wait to post after pics! We hope to have the bed completely finished by this weekend.  Maybe once that is done, I can really finish Mari's play kitchen.


Thursday, June 21, 2012

New Look

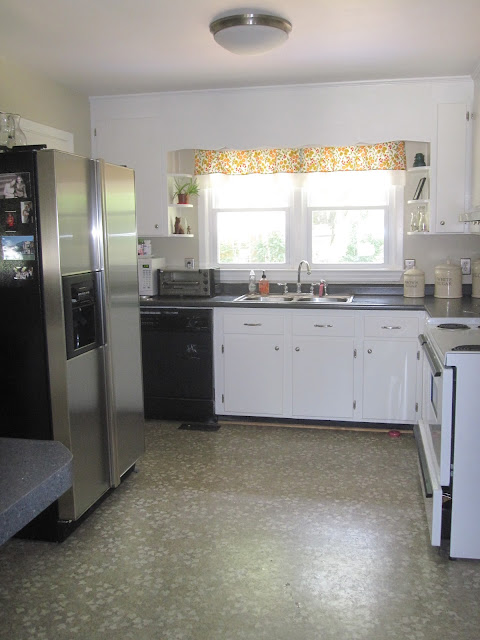
Saturday afternoon I took a couple hours to wander around my favorite thrift stores while Daniel stayed home with Mari. One of those stores is right next to the Habitat store, so I took a look in there as well. Happily, they had marked down all light fixtures from $25 to $5-15! So, I spontaneously bought a new ceiling light. Daniel put it up as soon as I got home. It's much brighter than the old one, which was better suited to a kids room (notice the moon and stars on it). Every time I go in the kitchen, turning on the light makes me so happy. 
Taking down the old light (with old refrigerator)

This new light prompted a serious urge to redo our kitchen and some even more serious craigslist searches for stainless appliances. We've always wanted stainless appliances, but didn't want to spend the money, since we don't plan to live here forever. So, used seemed the best option. After a couple days of searching, we looked at this kitchenaid superba model someone was selling. It's about 10 years old, but in good working condition. I like how the brushed finish doesn't show finger prints very well, even after smearing my hands all over it.
New light and refrigerator

So, now we have two refrigerators; one for the kitchen and one for the living room. =-) Unless Daniel decides he wants it in the shed, we will probably list the white one on craigslist or donate it to habitat. It's in our living room right now, the most out of the way spot in the house.

We also found a stainless dishwasher on craigslist that is sitting the the tool-room. It needs a new hinge. I'm sad about loosing our chalkboard dishwasher, but the soap dispenser broke and a new one would be so much more functional (as soon as we fix the hinge).

Getting the dishwasher home was easy, since the two of use could easily lift and place it in the back of the Matrix. The refrigerator took some work. I rented a pickup truck and appliance dolly from U-haul and Daniel and the seller managed to get it into the truck, keeping it upright the whole time. Our friendly neighbor helped unload it into the kitchen. Daniel made some ramps out of scrap wood that were essential in the transport. The whole process of getting the U-haul, picking up Daniel, buying and unloading the refrigerator, cleaning and setting it up, and returning the u-haul took about eight hours. At least 4 of those Daniel and I spent cleaning the new appliance.
Close up view

One thing that is kind of a pain is that we have no place to hang a dishtowel. We used to put one through the door handle. Another small downside is I have to keep my kitchen timer on the side instead of the front, since magnets won't stick to the stainless. It was worth it though. Not only do we have a newer, more aesthetically pleasing refrigerator, but now I know how to rent from U-haul and that Daniel really does have muscles of steel.

On a side note, the weather has been super hot down here lately. Here is a look at how Mari stays cool.


Tuesday, May 1, 2012

Ice Cream & Donuts

This weekend we made homemade ice cream and donuts. Those were the most exciting  events of the weekend. All the rest of our time was taken up with lounging around and general maintenance stuff like spraying for bugs, trimming our monstrous hedges and working on Mari's toy kitchen (I am waiting until completion for the big reveal).
Back to the food, on Saturday evening, we tried a recipe for Vanilla Bean Ice Cream from The Sweet Kitchen cookbook. Using the basic ingredients of egg yolks, 1/2 and 1/2, sugar, heavy cream, and vanilla beans, this was our first attempt at  making a custard based ice cream. Usually, we are too impatient to cook and cool it. Our first attempt at this recipe was a total failure. I whisked the egg yolks too much as Daniel poured in the hot cream, morphing them into a frothy mess. Then, as this was supposed to be thickening into custard over medium heat, I accidentally boiled it, turning everything from silky smooth creaminess into congealed egg. Very disappointed, we threw it out, drove to the store for more 1/2 and 1/2 and tried again. The upside of a second try is that now I have 12 egg whites in the fridge, enough for angel food cake! Attempt # 2 = pure bliss. Everything worked like it was supposed to (despite watching an old episode of Home Improvement while we cooked) and after rapidly cooling the custard in a bowl of ice water, we ice-cream-machined it into perfection.
P.S. We ate some more this evening and even after 24 hours in the freezer, it was very, very good. We will definitely be trying this recipe again, except next time maybe cinnamon or coffee flavored. 


On to the donuts. I attribute the urge to make these to baby #2. I REALLY craved homemade donuts. Not the store bought kind from Dunkin Donuts or Kroger (although I never turn those down), but the homemade kind, coated with butter & sugar. Not having time before church, we made and ate these for lunch. I used the Pioneer Woman's Homemade Donut Recipe, and they tasted fabulous. The only thing I did differently was let the dough rise for 1 hour in a warm over instead of overnight in the refrigerator.  Daniel went to the market while the dough was rising to buy a candy thermometer so we could heat the oil to just the right temperature. Cooking for less than a minute per side, frying was speedy.


Both of us love donuts rolled in granulated sugar, but the confectioner's sugar glaze came out really great too. Ahhhh, these hit the spot.


Saturday, April 28, 2012

Best Lemon Cake

I made this cake last night and it's soooo good. It was so good that I let Mari try some, breaking our no sweets until she knows what she's missing rule. So much easier than making lemon bars from scratch, it really hits the spot if your in a lemon kind of mood. I was in a fruit kind of mood, but we had no fruit except strawberries... Kind of a cross between pudding and cake, it's wonderful with whipped cream or strawberries.

Lemon Syrup
Combine and let sugar dissolve:
1/4 cup lemon juice
1/4 cup sugar

Lemon Cake
3/4 cup butter, at room temperature
1 cup sugar
1 1/2 teaspoons grated lemon peel
2  large eggs
3/4 cup all-purpose flour
1 tea. baking powder
1/4 teaspoon salt

Preheat oven to 350 degrees.
Butter an 8-inch square metal baking pan.
Cream butter, sugar and lemon peel until fluffy. Add eggs, then dry ingredients.
Pour the batter into pan and bake about 25 minutes.
Placing the pan on a rack, poke holes in the top of the cake and spoon over the lemon syrup, allowing it to soak in. Cool completely (we ate some before it was all the way cooled, and I prefer it slightly warm).

Adapted from Aunt Dimity and the Deep Blue Sea by Nancy Atherton. 

Friday, March 9, 2012

Spring Cleaning

I have been cleaning a lot lately. My spree started last week when Mari pulled our bedroom curtains down (rods attached). In her defense, they were not affixed to the wall very well. I bought and assembled the curtain rods and hung the curtains without Daniel's knowledge (as a surprise), so I didn't use anchors or look for studs... Daniel rehung the curtain rods a few days ago.  "Why in the world didn't I hang these in the first place," he yelled when he saw the couple dozen screw holes in the wall. In my defense, I don't remember making all those mistakes, so some of those holes were probably already there. I'm glad the rods are firmly attached now.  =-) If it wouldn't encourage bad behavior, I'd have Mari try swinging on our newly hung curtains. Daniel's work inspires that much confidence.
Since the curtains were already down, I washed and ironed them. That was a big chore, not having a big ironing board. I'm not complaining, since we hardly ever need a big ironing board. It was just a little tricky to maneuver on our mini one. Piled on the floor, our curtains picked up some dust, so that motivated me to wash all the floors and vacuum the rugs.  Then I washed our bedding and our pillows. I LOVE how our bedroom feels when it's perfectly clean and tidy. Every evening after Mari goes to sleep we've been relaxing in there, reading side by side on the bed and drinking mugs of hot tea. It's so nice to have a clean bedroom.
Add caption
Another reason I love this room is it's brightness. During the day, I can leave the shades pulled halfway down and lots of light still streams in. After living in an apartment with only three windows (north facing), I really appreciate sunlit rooms. Upgrading from a three window apartment to a 20 window house meant we needed lots of window treatments, but that's another post.

Monday, March 5, 2012

Knitting

Stuff I've always wanted to do but never thought that I could:

Drive a standard

Shuffle cards and do that cool bridge thing with them

Run over a mile

Knit

Happily for me, now I can do all those thing! This week I learned how to knit.  Several how-to videos and many hours later, the beginnings of a scarf were created. My yarn is a not very attractive teal color that we already had. Combined with uneven and missed stitches, this scarf may never see the outdoors. Trying a new hobby is fun though, and I'd like to improve enough to knit a hat or mittens. Once a month our library has a knit night where patrons take their projects and  knit together. If I can work up enough confidence, I may go next month.


I saw these Provincial Garden Mittens on Ravelry and think they are so pretty! Last week at my favorite thrift store I found some lovely, handmade, tan children's sized mittens for 50¢. After seeing these, I'm considering embroidering them.


Here's some other stuff on my list that hasn't been done yet:

Cook a delicious souffle (I tried this once - with expensive, disastrous results)

Ski down black diamond slopes, and like it